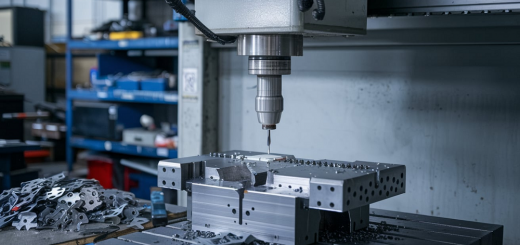
3 Types of Tool Changing Methods and Tool Changing Instructions for CNC Machining Centers
Tool changing is a critical operation in CNC machining that allows for flexibility and efficiency in the manufacturing process. Different machines utilize various tool-changing technologies to automate this process. This article will provide an overview of hat-style tool changing, Disc-type tool changer, and Chain tool changer, including their operation process, common control commands, and advantages over other tool-changing technologies.
1. Hat-Style Tool Change
The hat-style tool change is very fast and does not require human supervision for continuous processing. The hat tray can accommodate multiple tools, saving the time of frequent loading and unloading of tools, which makes it easier to achieve a high degree of automation in mass production.
Operation process of bamboo hat-style tool change
- 1. When the current work program needs to change the tool, the control system automatically identifies the tool type and selects the corresponding tool position.
- 2. Send a T00 command to control the turntable motor or cylinder to drive the turntable to rotate and position the tool to be replaced to the tool change position.
- 3. Send M06 command to control the machining center to perform automatic tool change action:
- – The fixed tool pushes the old tool out of the tool holder, and the old tool automatically returns to the specified position of the turntable.
- – The fixed tool pushes the new tool into the tool holder, and the new tool is automatically locked on the tool holder.
- 4. The system checks whether the new tool is fully installed and locked, and sends a prompt sound and indicator light to notify the operator.
- 5. After the operator observes and checks that it is correct, he gives the system a tool change completion instruction.
- 6. The system restores the processing program and starts using the newly replaced tool to process the next process.
- 7. If it is replaced manually, the tool needs to be manually replaced through M61 in step 3, and the system will be given a tool change completion signal after the replacement.
- 8. After the tool is used, repeat the above process to change the tool for the next tool position.
Common instructions for bamboo hat-style tool change
- T00: Switch to the specified tool position, such as T00=2 means positioning the second tool to the replacement position.
- M06: Automatic tool change, the control system automatically selects and positions the new tool according to the tool type required by the current work program.
- M61: Manual tool change, Manual tool change is required before starting.
| G91 G28 Z0 M06 T03 | Z axis returns to tool change point Spindle changes to tool No. 3 |
| G91 G28 Z0 M06 T04 | The spindle is replaced with a No. 4 tool |
| G91 G28 Z0 M06 T05 | The spindle is replaced with a No. 5 tool |
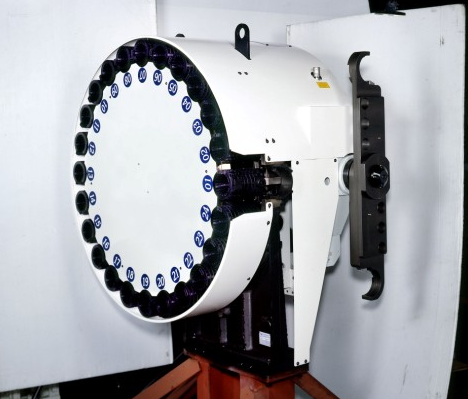
2. Disc-Type Tool Changer
The disc-type tool changer has a simple structure and is relatively cheap compared to other tools. The disc-type tool changer has a certain improvement over the single tool, but its automation level and application range are not as good as the bamboo hat-type. It is only suitable for medium-frequency automatic tool change and is generally widely used in the electromechanical industry, hardware and kitchenware industry, household appliances industry, and papermaking industry, such as the rice cookers and air intake fans we use in our lives.

Disc tool change operation process
- 1. The control system identifies the type of tool to be replaced.
- 2. Send a T command to position the disc to rotate the required tool to the tool change position.
- 3. Send the M06 automatic or M61 manual command to start the tool change.
- 4. Clamp the new tool to the tool holder, and send the tool change completion command manually after inspection.
- 5. Restore the program and continue processing with the new tool.
Common tool change commands
- T00: Position the specified tool position, such as T00=5 to position the 5th tool.
- M06: Automatic tool change command.
- M61: Manual tool change command.
| Tool selection and tool change overlap -N10 G91 G30 Z10 -N20 T02M06 | – Return to tool change point – Select tool T02 and change it to the spindle |
| Tool selection and tool change are separated -N10 G01 Z-T02 -N017 G30 Z10 M06 -N018 G01 Z-T03 | -Select tool T02 during machining -Return to reference point and change tool T02 -Select tool T03 during machining |
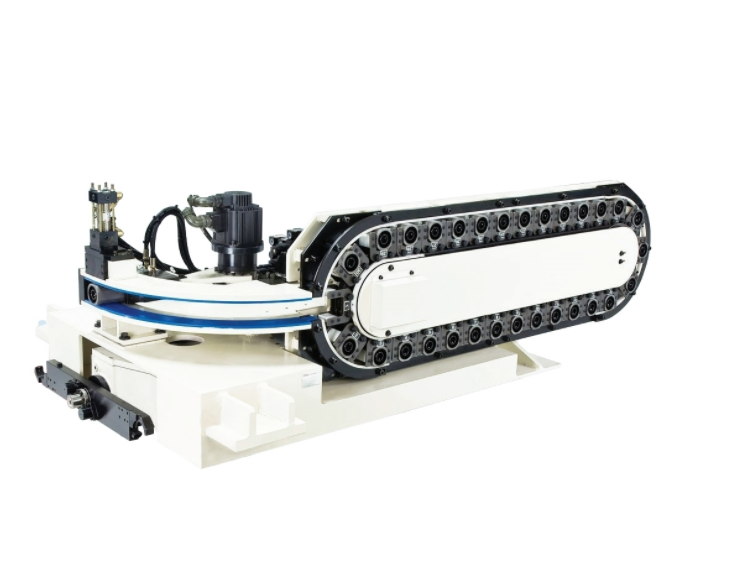
3. Chain Tool Changer
The compact design of the chain tool changer ensures accuracy. The chain tool magazine is less likely to drop the tool during the tool change process, which improves the safety of tool change and makes tool change more flexible.
Chain tool change operation process
- 1. The control system identifies the type of tool to be replaced.
- 2. Send a transmission command to drive the chain to move and send the target tool to the tool change position.
- 3. Send the M06 automatic or M61 manual command to start the tool change.
- 4. The new tool is clamped to the tool holder, and after inspection, the tool change completion command is given.
- 5. Restore the program and continue processing with the new tool.
Common tool change commands
- M06: Automatic tool change command.
- M61: Manual tool change command.
- T00: Position the specified tool position, such as T00=5 to position the 5th tool position.